Tuesday, February 28, 2012

Splat!


Splatter-design wine glasses...a fun, easy way to spice up your set of vasos de vino. You can use any color scheme; it can be one that matches your kitchen, one that matches your wedding (inexpensive bridesmaids' gifts, anyone?), or one that has your favorite colors. The possibilities are endless! 

I purchased a set of four wine glasses, two red and two white, from Bed, Bath, & Beyond for ten bucks. The first step in any craft using glass is to wash with soapy water and dry completely. An additional great tip is to apply rubbing alcohol after to remove any spots that may have lingered after washing.

The next material you need is glass paint. Depending of which brand you buy, it may require a conditioner as a first step. I had Delta's PermEnamel in my craft bin, which does require a conditioner.  The conditioner comes in a large bottle (see right) and it about $7. With a sponge brush, I coated all four glasses with the thin solution, and set them aside to dry. These dry very quickly, and in order for the solution to be "active", you must apply the glass paint within four hours. If you pass the four hour mark, you have to start re-condition the surface. 


For the red wine glasses, I decided to use the Royal Purple & Light Burgundy colors I had to represent the purple/red grapes. For the white wine glasses, I used the Light Foliage Green & Green Tea colors I have to represent the green/white grapes. (Paint: Delta PermEnamel)


Next, I prepped my glasses and painting area. Since I wanted to leave the stems of the glasses unpainted, I covered them with a small piece of tissue paper. For my "splatting" area, I brought home two shoe boxes and a bunch 'o rubber bands from work. All you need to do is stretch the rubber band around the open shoe box and viola!: you just made your own ghetto spin art. 

 I then placed a wine glass in the box (underneath the rubber band), grabbed a paint, and lightly painted to underside of the rubber band. I pulled back the rubber band and let go. And thus begins the splatter effect! I moved the rubber band forward, back, and on a diagonal to get overall good coverage at different angles. I did one color shade first, and then switched to the second shade. I re-painted the rubber after every other snap.

When I was finished splatting all for glasses, I took off the tissue paper and was really happy with the new wine glasses! I am going to go ahead and apply a gloss finish later for extra hold. This step is not necessary, but Delta offers finishes, and I figured it would be an extra whammy to keep the paint lasting longer and the gloss will give the glasses added shine. Even though the paint dries within an hour, you should wait 10 days before using/washing. So, say mid-March I'll be getting Cj drunk ;)
Pin It

Sunday, February 19, 2012

Chalkay!

Fun without the commitment ;) 


(Aerosmith - Pink / No Copyright Infringement Intended)
Check out the new hair chalking attempt with Blue!


Pin It

Thursday, February 16, 2012

Word to Your Mom...

I apologize in advance - this is not a "How-to" post because I didn't film myself making them, nor do I have a "How-To" link, but it can serve as an inspirational post for all the Scrabble lovin', do-it-yourself'ers out there!


Ah, Buddy, he gets me every time. As a finalist in this 2011 Scrabble Championship, I am clearly a lover of Scrabble. I also am a lover of Scrabble crafts. I find that any way the letters are integrated into something other than the game is clever and geek chic. Hence my inspiration for the Scrabble pillows I made for our bed- "C" for Cj and "L" for Leanne.


In a nut shell, I went to JoAnn's fabric and bought a material I felt looked close enough to the color of pieces that come with the game. I literally cut squares for the pillows and left the back piece longer than the front so it could overlap for a back closure.


For the letter, I opened up Microsoft Word and started playing around with fonts.  I felt that Arial Narrow looked pretty legit when I blew up the letters. I then took a look at my Scrabble pieces to check the scoring of each letter. (If you don't have the game, you can find the values online. Then, I printed out the letters on a high quality iron-on sheet (one that will not crinkle easily) and ironed them on the front square.


Next, I jumped on an old sewing machine, turned the squares inside out, and sewed the edges together. I left an opening that you can see in the above picture to stuff the cases. (There are a bunch of tutorials online on how to sew a pillow case - all it takes is a simple Google search). Since I didn't make the cases according to a certain pillow insert size, I just stuffed them with a soft polyester filling I purchased at Wal-Mart and viola! 

They were really easy to make and if you're not a DIY'er, you can purchase these cases on Etsy. I gave them to Cj as an early Valentine's Day gift and they look great on our new bed :)

Pin It

Tuesday, February 14, 2012

Happy Valentine's Day ♥

Hey love birds, it's that time of year again to grab your honey buns, squeeze 'em tight, and stuff 'em with sweets.

This year I made Cj a Box O' Chocolate Cupcakes from my Hello! Cupcake book. It was fun and came out great!


I baked 24 chocolate mini cupcakes (I wound up using 18) and filled each with vanilla frosting. Since I couldn't find brown mini-liners, I just sprayed the pan and did without them. After they completely cooled, I iced half of the cupcakes with chocolate icing. Then, I rolled the sides with sprinkles and decorated them with Valentine candies (I couldn't find Valentine-themed candy corn as the book has for flower petals, so I substituted by chopping up Starburst FaveReds).

With the remaining half, I melted dark chocolate frosting in the microwave (10-15 seconds) and dipped the tops of the cupcakes to give them a smooth coating. For the actual "chocolates", I cut jumbo marshmallows in half lengthwise for the rectangular candies and width wise for the round candies. I reheated my dark chocolate icing (it hardens rather quickly), dipped the marshmallow halves in to fully coat them, and transferred them onto wax paper for ten minutes in the fridge. When these were set, I put them atop of the dark chocolate dipped cupcakes and piped swirls/zig-zags with vanilla and chocolate icing. For the finishing touch, I put them in an actual heart-shaped box (I bought a box of chocolates and removed the insert) and filled in the empty spaces with Valentine M&Ms.

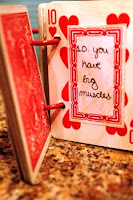
In addition to these carb-filled sweets, I made Cj a heart-filled sweet book of cards with inspiration from Pinterest: 52 Reasons I Love You.

I bought a new deck of cards and since I wanted to achieve a vintage look, I had to rough them up a little bit. With the help of sandpaper, I gave them a dated texture. Next, I printed these free labels that were the perfect size and I smacked them to sticky dot paper that I purchased from Michael's (this is awesome; it will turn any paper goods into a sticker!). Then, I wrote out my 52 reasons, cut them out, and then stuck them on each card.

To give the cards an even more vintage look, I rubbed a Tim Holtz Distressed Ink Pad all over the back and front of each card. I swear by these ink pads for vinterizing (yeah, I said it, vinterizing) crafts. I used the joker card to make the cover (done with scrapbook paper, stamps, and an embosser) and put picture of us (with a sepia effect) on the inside.

My dad clamped the deck and drilled two holes completely through the deck as I nervously anticipated the destruction of my project. I was going to individually hole punch each card twice - 108 punches to be exact - and he convinced me otherwise. I was happy he did; it took a few minutes and went along with the "used" look. Lastly, I hooked the cards together with red binders rings (Office Depot). This is a great gift for any occasion of the year and I'm really happy with the way it came out!


So there you have it; easy and fun crafts I made for my babe with mucho love. I hope everyone has a great Valentine's Day, and remember, you don't have to have a honey to spread some lve!
Pin It

Sunday, February 12, 2012

I'm Melllllttttiiiiiinnnngggg

Bust out your crayolas- there ain't nothin' to it but to do it! 

(Tyga - Rack City / No Copyright Infringement Intended)


Pin It